
🙂 𝙳𝚊𝚢 𝟸𝟻 𝚃𝚊𝚜𝚔 - 𝟿𝟶𝚍𝚊𝚢𝚜𝚘𝚏𝚍𝚎𝚟𝚘𝚙𝚜: 𝙲𝚘𝚖𝚙𝚕𝚎𝚝𝚎 𝙹𝚎𝚗𝚔𝚒𝚗𝚜 𝙲𝙸/𝙲𝙳 𝙿𝚛𝚘𝚓𝚎𝚌𝚝 - 𝙳𝚘𝚌𝚞𝚖𝚎𝚗𝚝𝚊𝚝𝚒𝚘𝚗 🙂

Task-01: README Documentation for CI/CD Pipeline
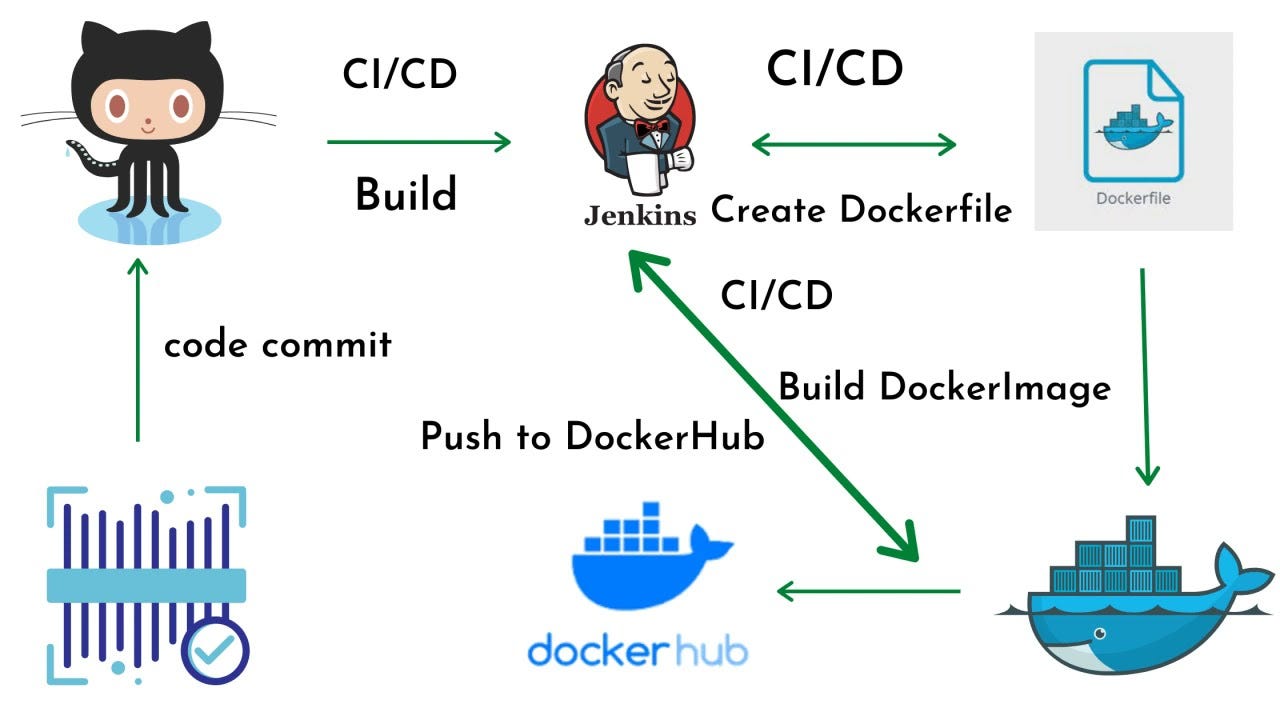
Project Title: Node.js CI/CD Pipeline with Docker, Java, and Jenkins
Overview:
This project sets up a continuous integration and continuous deployment (CI/CD) pipeline for a Node.js application using Docker, Java, and Jenkins on an AWS EC2 instance. Follow the steps below to replicate the setup.
Steps:
Launch an EC2 Instance:Launch an EC2 instance on AWS with an Amazon Linux 2 AMI / Ubuntu.
Connect to EC2 Instance:Connect to your EC2 instance using SSH.
Install Docker:bash
sudo yum update -y sudo apt-get install docker sudo service docker start sudo usermod -a -G docker ec2-user
Install Java:bash
sudo yum install java-1.8.0-openjdk -y
Install Jenkins:Download and install Jenkins from the official Jenkins website.Access Jenkins dashboard in your web browser.
Create Jenkins Job:Create a new job, name it, and select "Pipeline" as the job type.In the job configuration, select "Pipeline script" and paste the provided script.
Configure GitHub Webhook:Save the job and go to its configuration page.Under "Build triggers," select "GitHub hook trigger for GITScm polling."
Create GitHub Webhook:In your GitHub repository settings, navigate to "Webhooks" and create a new webhook.Set the payload URL to http://<jenkins-host>:<jenkins-port>/GitHub-webhook/.
Create Docker Compose File:Create a docker-compose.yml file in the project root with the provided content.yaml
version: '3.9' services: web: build: . ports: - "8000:8000"
Commit and Trigger Pipeline:Commit changes to your GitHub repository and wait for Jenkins to trigger the pipeline automatically.
Access Deployed Application:Once the pipeline completes successfully, your application should be accessible at http://<publicip>:8000/.
Conclusion:
Congratulations! You have successfully set up a CI/CD pipeline for your Node.js application.
Task-02: Goal Setting
Goal: To Become a DevOps Engineer
Strategies:
Develop a Strong Foundation in Software Development:Learn programming languages (e.g., Python, Java).Understand version control systems (e.g., Git,GitHub,Git Lab).
Gain Expertise in Automation Tools and Technologies:Learn and practice automation tools (e.g., Ansible, Puppet, Chef).Master containerization and orchestration tools (e.g., Docker, Kubernetes).
Learn About Cloud Computing:Gain proficiency in cloud platforms (e.g., AWS, Azure).Understand infrastructure as code (IaC) principles.
Focus on Collaboration and Communication:Enhance teamwork and communication skills.Understand the importance of cross-functional collaboration.
Stay Current with Industry Trends:Follow industry blogs, forums, and attend conferences.Stay updated on emerging technologies and practices in DevOps.
Practice Continuous Learning:Engage in ongoing learning through courses and certifications.Regularly explore new tools and methodologies in DevOps.
Note to Self:
Continuous learning is key; stay consistent and never give up on the journey towards becoming a DevOps engineer.