Setup Kubernetes Cluster Using Kubeadm
How To Setup Kubernetes Cluster Using Kubeadm

In this blog post, I have covered the step-by-step guide to setting up a kubernetes cluster using Kubeadm with one master and two worker nodes.
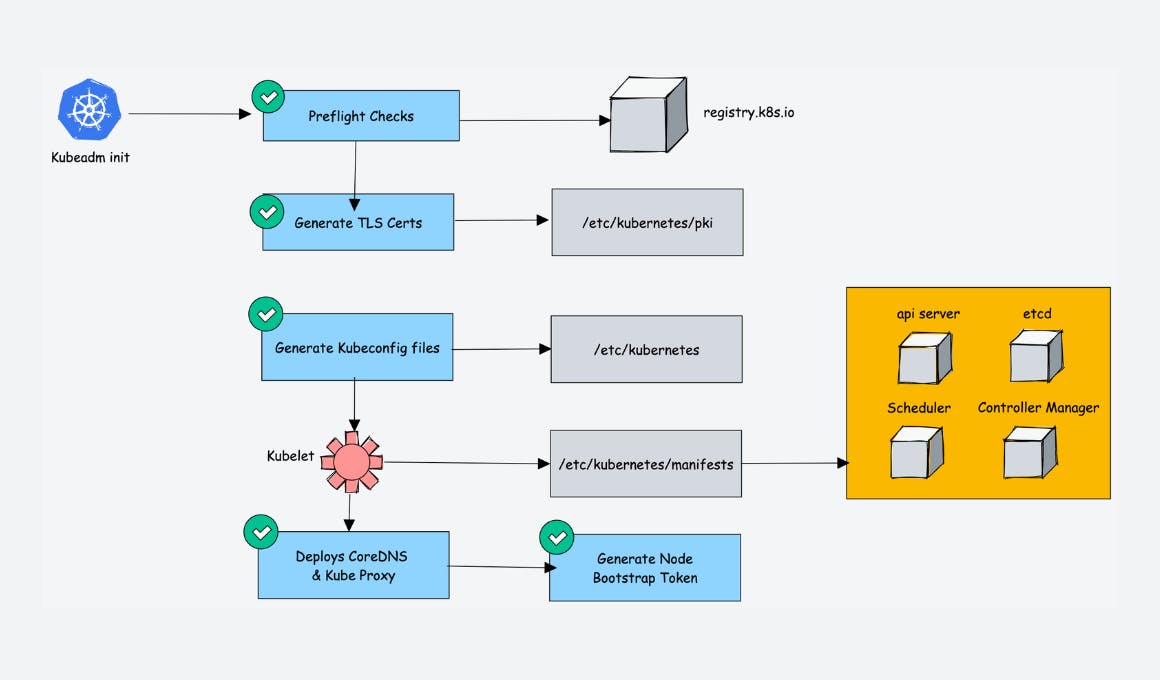
Kubeadm is an excellent tool to set up a working kubernetes cluster in less time. It does all the heavy lifting in terms of setting up all kubernetes cluster components. Also, It follows all the configuration best practices for a kubernetes cluster.
What is Kubeadm?
Kubeadm is a tool to set up a minimum viable Kubernetes cluster without much complex configuration. Also, Kubeadm makes the whole process easy by running a series of prechecks to ensure that the server has all the essential components and configs to run Kubernetes.
It is developed and maintained by the official Kubernetes community. There are other options like minikube, kind, etc., that are pretty easy to set up. You can check out my minikube tutorial. Those are good options with minimum hardware requirements if you are deploying and testing applications on Kubernetes.
But if you want to play around with the cluster components or test utilities that are part of cluster administration, Kubeadm is the best option. Also, you can create a production-like cluster locally on a workstation for development and testing purposes.
Kubeadm Setup Prerequisites
Following are the prerequisites for Kubeadm Kubernetes cluster setup.
[if !supportLists]1. [endif]Minimum two Ubuntu nodes [One master and one worker node]. You can have more worker nodes as per your requirement.
[if !supportLists]2. [endif]The master node should have a minimum of 2 vCPU and 2GB RAM.
[if !supportLists]3. [endif]For the worker nodes, a minimum of 1vCPU and 2 GB RAM is recommended.
[if !supportLists]4. [endif]Network connectivity between the machines
Step 1: Update the system and install necessary packages
On both master and worker nodes
sudo apt update
sudo apt install -y docker.io
sudo systemctl enable docker
sudo systemctl start docker
# Disable swap on both nodes
sudo swapoff -a
sudo sed -i '/ swap / s/^\(.\*\)$/#\1/g' /etc/fstab
Step 2: Install Kubernetes tools on both nodes
# On both master and worker nodes
sudo apt-get update && sudo apt-get install -y apt-transport-https curl
curl -s https://packages.cloud.google.com/apt/doc/apt-key.gpg | sudo apt-key add -
echo "deb http://apt.kubernetes.io/ kubernetes-xenial main" | sudo tee /etc/apt/sources.list.d/kubernetes.list
sudo apt update
sudo apt-get install -y kubelet kubeadm kubectl
sudo systemctl enable kubelet
sudo systemctl start kubelet
Step 3: Initialize the Kubernetes master (on the master node)
# On the master node
sudo kubeadm init --pod-network-cidr=10.244.0.0/16
Note the kubeadm join command that is displayed at the end. You'll need this command to join the worker node to the cluster.
Step 4: Set up the kubeconfig for the user (on the master node)
# On the master node
mkdir -p $HOME/.kube
sudo cp -i /etc/kubernetes/admin.conf $HOME/.kube/config
sudo chown $(id -u):$(id -g) $HOME/.kube/config
Step 5: Install a network plugin (on the master node)
# On the master node
kubectl apply -f https://raw.githubusercontent.com/coreos/flannel/master/Documentation/kube-flannel.yml
Step 6: Join the worker node to the cluster (on the worker node)
Use the kubeadm join command that was displayed after initializing the master.
# On the worker node
sudo kubeadm join <master-node-ip>:<master-node-port> --token <token> --discovery-token-ca-cert-hash <hash>
run on Master Node
kubeadm token create --print-join-command
Replace <master-node-ip>, <master-node-port>, <token>, and <hash> with the values specific to your cluster.
Step 7: Verify the cluster (on the master node)
# On the master node
kubectl get nodes
This should display both the master and worker nodes, and their STATUS should be Ready.
Your Kubernetes cluster with one master and one worker node is now set up. You can deploy and manage applications using kubectl.